Clip Wizard
Clip Wizard
Every streamer has a different setup. Your HUD, facecam position, overlay, and scene layout are not the same as everyone else's — which means EzClap needs to know exactly how to turn your horizontal Twitch stream into a clean vertical short.
That is what the Clip Wizard is for.
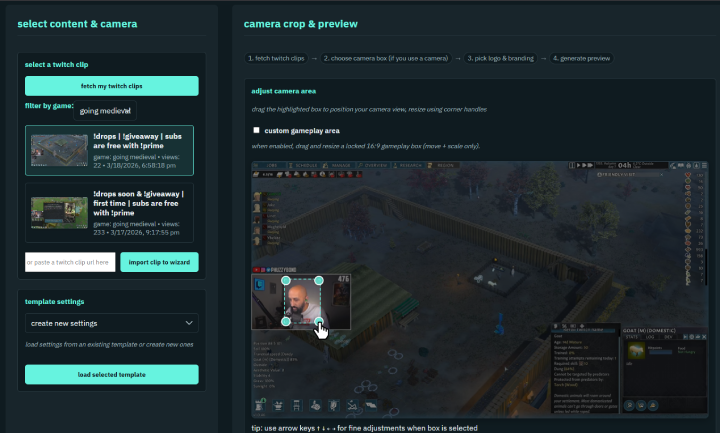
The wizard is a visual drag-and-drop editor for vertical video. You design a 9:16 layout once — where your facecam sits, how your gameplay is framed, where your logo goes — then save it as a template that every future clip is rendered through automatically. Instead of guessing, you work with a real clip from your own channel as the live sample.
The setup is split into two parts:
- Clip Wizard = where you visually draw and position everything
- Templates = where your saved layouts live and get assigned to games
Step 1: select a clip to design with
- Click fetch my twitch clips to load recent clips from your channel.
- Optionally filter the list by game to find a clip that matches your usual stream layout.
- Select a clip and click import. The wizard uses this clip as the live sample while you design.
If you already have templates, you can pick one from template settings and click load selected template to start from an existing layout.
Step 2: camera crop and gameplay area
Under adjust camera area, drag the highlighted box over your facecam in the source video and resize it with the corner handles so it fits tightly around your camera frame. Arrow keys nudge the selected box for fine adjustments.
Gameplay area
Most of the time you do not need to set this up manually — EzClap already knows where the gameplay is. If your camera sits at the top or bottom of the clip, the remaining height becomes the gameplay area, centered on screen. If you use a floating camera, gameplay fills the entire clip at max height.
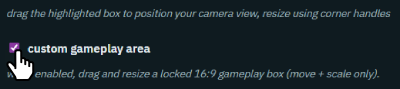
However, some streamers run their gameplay windowed or in a specific region of the screen. That is where the custom gameplay area comes in: enable it and you get a locked 16:9 gameplay box you can move and scale over your horizontal preview, so you control exactly which part of the gameplay fills the vertical frame. EzClap remembers that as your gameplay area from then on.
- Second camera — Pro / Partner accounts can enable a second cam box for co-streams. See duo cam mode.
Step 3: camera position and floating overlay
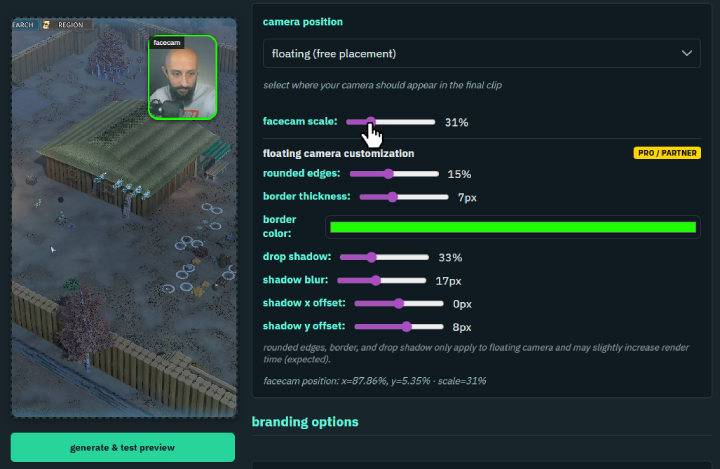
Choose a camera position for the final clip:
- no camera (gameplay only) — skip the facecam entirely; gameplay gets the full height of the clip.
- top or bottom — classic stacked layout with the cam in a fixed band.
- floating (free placement) — the facecam becomes a draggable overlay you position anywhere on the preview.
With floating placement you can set the facecam scale (15–80%). Pro / Partner accounts also unlock floating camera customization: rounded edges, border thickness and color, horizontal mirroring, and a drop shadow with blur and X/Y offset controls. These styles only apply to the floating camera.
Step 4: branding
If you want your branding on clips, this is where it happens:
- Logo placement — anchor your logo to a corner of the camera, or choose manual placement and drag it anywhere on the preview. Once saved, EzClap applies that logo placement automatically to every future clip.
- Upload a PNG, JPEG, or GIF logo (max 1 MB) and adjust logo scale (10–200%).
- Watermark — free accounts export with a small EzClap watermark; Pro / Partner accounts have it removed automatically.
Step 5: preview and save
- Use the guides toggles — crosshair, thirds, and safe zones — to line up your layout against platform UI overlap areas (see the TikTok safe zones guide).
- Click generate & test preview to render a short test of the actual output, then drag the facecam and logo directly on the preview to fine-tune positions.
- Click save settings to store the layout, or save as template to name it (or overwrite an existing template) so it can be reused and assigned to games.

Set it once, let it run
Once saved, new Twitch clips sync and render through this layout automatically — cleaner vertical clips, better framing, consistent branding, and no manual re-cropping every time you switch games. Manage your saved layouts and per-game assignments on the templates page, and see connecting your Twitch account for how clips sync in.